Saturday 25 February 2012

Playing with Light

I want to get better with my photography lighting so I thought I'd try something extreme and get a completely dark background and the light on the three dice in the foreground...it took a few shots but this more or less get the shot I was after.


Tuesday 7 February 2012

Remove the Aberration

Chromatic aberration, also commonly referred to as purple fringing, happens a lot. It’s a myth that expensive lenses eliminate the problem although they certainly help reduce it.

It normally occurs in areas of high contrast where you have a bright colour right next to a darker one.

It’s also not always purple: it can be blue, cyan, purple, yellow and it is not always the same colour in one picture.

It is easy to fix and its presence in a photograph can really detract from the image: drawing the eye to where it shouldn't be because of the unnatural colours.  Stock photography sites such as iStockPhoto will reject any image with a hint of chromatic aberration so knowing the right techniques and software to cleanly repair the photograph is crucial.

This picture of The Needles off the coast of the Isle of Wight demonstrates it really well.


If we zoom in to view the picture at full size, you can see the purple fringing on the left and the blue along the right edge:


There are a myriad of ways to get rid of this through post-processing. I’m a huge fan of non-destructive editing: always preserve the original picture; you never know when you might need it. I have also excluded methods which only deal with chromatic aberration of one colour within a picture or which can impact the rest of the colours in the picture.

Below I’ve detailed the two simplest ways to deal with it that maintain the quality of everything else.

The first method uses Lightroom:
  1. Go to the Develop section
  2. Zoom into your picture to see the chromatic aberration. If possible, try and get onto the same screen an example of all colours of chromatic aberration
  3. Scroll the right hand panel down to the “Lens Corrections” section. You’ll see two “Chromatic Aberration” sliders.
  4. To get rid of purple fringing, I moved the Red/Cyan slider to the right. Don’t move it too far or you’ll make it worse
  5. To get rid of the blue fringing I moved the Blue/Yellow slider slightly right
  6. If you have other colours, experiment with moving the sliders left or right.

This is what I end up with:


To make more selective edits, you can use Photoshop:
  1. Add a new layer
  2. Set the layer mode to ‘Color’. This will enable you to paint over the chromatic aberration with a brush but only change the colour: the saturation and brightness will stay the same
  3. Select a colour which you want to paint over the chromatic aberration. This should be a colour to the left or right of the fringing itself, or go for white. (Press i to get the colour picker and then click on part of the picture which contains your chosen colour).
  4. Select the Brush Tool
  5. Reduce the opacity and flow to 50% each
  6. Make sure you feather the brush and the brush size is slightly smaller than the width of the chromatic aberration
  7. Gently paint over the chromatic aberration. You will see it turn to your chosen colour. You may need a couple of strokes
  8. As everything is being done on a new layer, don’t worry about making mistakes. Just use the eraser to clean up

For this picture, I painted blue on the outside and tidied up some of the rocks with a white overlay:


This is what the final result looks like:
Which method should you use? Lightroom is definitely quicker but you may find it doesn't get rid of everything in which case I'll clear up the worst of it using Lightroom and then Photoshop out the rest of it.

Friday 18 November 2011

La Vallée des Singes

A definite monkey theme to this blog post! These are some of my favourite pictures from a recent trip to France and La Vallée des Singes: the Valley of the Monkeys. An amazing place where the monkeys are allowed to roam freely with some wonderful photo opportunities.


I love these Silverback Gorillas. They are amazing creatures: huge yet graceful and they walk through the forest with a definite authority.


Tuesday 8 November 2011

Les Giants de Ciel

A couple of the best pictures from a recent trip to Les Giants de Ciel (Giants of the Sky). Admittedly, these are just birds standing still so technique doesn't really come into play. Nonetheless, being able to get so close to the birds and have an uncluttered background leads to some really striking poses. Check out my earlier post on removing reflections from the eyes.


Wednesday 2 November 2011

In the eye of the beholder

I recently went to Les Giants de Ciel in Chauvigny, France. It was by far the best ever 'falconry' display I've ever seen with a fantastic variety of birds amidst a spectacular setting.

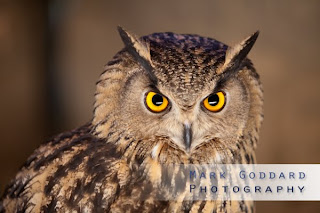
As is often the case, there were several birds dotted around the grounds and you could wander around and see the birds up close. I was really pleased with a picture of an eagle owl, until on closer inspection I could see myself reflected in its eye.

Before:
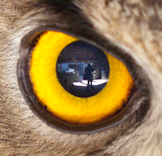
I tried cloning out the reflection of me using Photoshop and whilst it worked to a degree, there was still a lot of clutter in the background, detracting from the picture. I found the best solution was to burn the pupil area. This darkens the pupil, obscuring the unwanted detail, but doesn't make it an unnatural pure black.

You can do this in a non-destructive manner:
  • Create a blank layer on top of your main picture
  • Set the layer to be "color burn"
  • Set your colour to be black
  • Choose a brush with a low opacity to gradually paint over the pupil to achieve the desired effect

Make sure you keep the catch-light.

My burn layer looks like this:

Now, if you want to tidy up your burning, you can reduce the impact by changing the layer opacity, or refine it using the eraser or select a white brush to vary the effect.

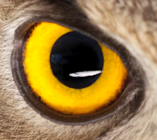
The final result (which I think works really well, but I am biased!):


Friday 28 October 2011

Free Stock Photos

If you are looking for some amazing high quality photographs (even if they are not mine!), try www.istockphoto.com. If you use the link below you will get a bunch of free credits.


Thursday 20 October 2011

Newborn baby lightbox

After having a some very popular photos in my first newborn baby lightbox I thought it was long overdue that I setup a new lightbox of the newest addition to my family on istockphoto.

I love this expression on her face at bath time:


...and this one makes me smile as she can be a drama queen at times!


One can never have enough of cute hand and feet shots as they grow up so quickly:


But right now, she's fast asleep and I've got a rare chance to update some photos!